Tuesday, January 31, 2012

Valentine's Decor

Things were looking a little sparse around here after taking down all of the Christmas decor, so I was itching to start decorating for Valentine's Day. The only problem was that I had almost nothing in the way of Valentine's decor. I had one lonely pink teapot with red hearts and of course my Valentine's wreath. All of that changed with the use of some scrapbook paper and a trip to the Dollar Spot at Target. I made 2 different garlands for my house. One is the linked paper hearts, which I found on Pinterest. I decided to cut strips of paper in pink and red and alternated colors to create a colorful garland to drape from the hutch in my dining room.

Next I cut out paper hearts using different pastel colored papers. I looked up and wrote different messages such as the ones you would find on conversation hearts, my favorite candy! I attached the hearts to a length of red ribbon and draped it from the fireplace mantle.
Though the hearts helped to make it a little more festive, the mantle was still missing something. I hit up the Target Dollar Spot and purchased 4 mini mailboxes- one for each member of our family. I also purchased the "LOVE" blocks and added them to my mantle display.

Finally, I purchased the set of 3 I heart U containers from Target and added them to our dining room mantle. They looked kind of plain, so I went back to the Dollar Store to find some flowers to put inside. I purchased flowers, but I also purchased a package of sparkle heart picks. I added the sparkle heart picks and they were perfect!

During my second trip to the Dollar Store, I also picked up a package of heart shaped doilies. I taped a few of them in each of our picture windows. Things were looking really good, but I knew that I had to stop! It was clear that my purchasing cheap Valentine decorations and placing them all over my house was becoming compulsive!
Thankfully, over the weekend, we tackled my daughter's homemade Valentine's for her Pre-school class. We had recently completed a project that I saw on Pinterest, multi-colored crayons. Though the Pinterest version was heart shaped, we used a small cupcake pan that I had on hand for ours. The pan made more than we would ever use, so I thought that giving them as Valentine's would be a perfect solution. I cut some card stock the same size as a plastic bag and had Reese go to work writing her name and adding stickers to each of the cards. I then printed, "Valentine, you color my world!" and stapled the bag with a crayon onto the card. Reese worked so hard and was so proud of her cards when she was finished.


We could have printed something fancy on the cards, but I love that Reese was in charge of the project and it looked like it came from her, not that a parent had made them for her.
For Valentine's Day, we had books for each of the kids at the table when they came down to their breakfast of heart shaped doughnuts. After work and pre-school, we had heart shaped pizza for dinner. After dinner I gave my husband his gift, a coupon book of dates for each month until the end of the year. Some of the dates are things that we can do with the kids and some are intended to be dates for just the two of us. Some of the dates will cost some money, but others will cost very little. I included a few things that we have talked about doing and never done, such as going to the drive-in and going to a comedy club. My husband remarked that it was one of the best gifts he has ever gotten. It was one of the best Valentine's Days that I have ever celebrated. I think that we made it special for both the kids and ourselves without going overboard or trying to make things perfect.

Tuesday, January 24, 2012

Two Shirts into One

I am at the point in my pregnancy where I feel like I have nothing to wear! I feel like I wear the same outfits every week and am so bored with my wardrobe! Though I have purchased some new things, most of those have been dresses and warm weather clothes for our upcoming family vacation to Florida. I am using a lot of the clothes from my previous 2 pregnancies, but this one is different in that I am always cold, whereas with my previous pregnancies, I would sweat in a short sleeve shirt and light weight pants!
With the feeling of being short on my wardrobe, I need to make use of everything that I have. Having two maternity shirts that I did not wear, was not making good use of the wardrobe I have!
The first shirt was a long sleeved wrap dress shirt. The shirt wrapped and tied in the front. Besides the fact that the tie was bulky and added to my already expanding waist, the sleeves were too short. I got a little ahead of myself, so this picture is after I had cut the sleeves off.

The second was a short sleeved sweater with an attached collar. Though I loved this shirt, it was not warm enough. In this picture, I had already inserted one of the sleeves from the wrap shirt to see how it would work.

I cut the sleeves off of the dress shirt just past the shoulder seam. Then I turned both shirts inside out and matched us the shoulder seams, pinning the two pieces together. I then hand stitched the two pieces together.
Doubting Thomas, my husband, looked at me while I was sewing the shirts together and said, "I am going to laugh when that doesn't look right and you have wasted all of this time on it!" Thanks a lot honey!
After watching a few of my favorite shows, I was finished and turned the shirt right side out. I couldn't see any of the stitches and it did not look bulky or crooked, so I rushed to my room and immediately tried it on. I was ecstatic that it fit and gloated to my husband that it turned out exactly the way I imagined.
I had my 4 year old daughter take this morning as we rushed out the door to daycare and work. It's not the best picture, but I love my new shirt!

Right behind me is a project that I have been working on for several weeks now! I'm hoping to get that finished and out of my dining room this week. I may not have anything to wear, but I have been seriously nesting and that means that a lot of my to-do's are getting crossed off!

Saturday, January 21, 2012

Kids Art Displays

Like most kids, my kids love to draw, color and paint. I have stacks of their artwork and have run out of room to display it on the refrigerator and closet doors of our main floor.
Since their rooms are on the second story of a story and a half home, they both have walls where the ceiling slopes and meets the wall at about half the height of the opposite wall. These walls have mostly remained undecorated and bare. Aidan's bedroom: the bed is up against the wall and there is no artwork.

Reese's room: I had moved the rocking chair to another part of the room and the vanity is in storage as she rarely used it, leaving the changing table and a dresser on either end of the wall, nothing in the middle!

I recently had a lightbulb moment and thought, why not turn that unused space into an art display? The kids could proudly display their art in their own rooms and it would give me something interesting to put on these boring, blank walls.
Aidan had three hooks in his room that I originally purchased on clearance at Marshall's to hang his baby quilt in his room. I took the hooks down and replaced them with Command Hooks.

I then hung the decorative hooks on the long short wall. I tied a strand of yarn between each of the hooks and simply used clothespins to attach the art to the yarn.

The kids were playing in their rooms as I worked on this quick project. As I stood back to see how the display looked, Reese came in and immediately asked, "Mommy, where is mine? I want to hang my pictures too!"
I did not have any extra decorative hooks, so I screwed eye screws into the wall and tied yarn between them. I plan to keep looking for something decorative to add to these screws, but they do the job for now!

Monday, January 16, 2012

Barn Quilt Tutorial

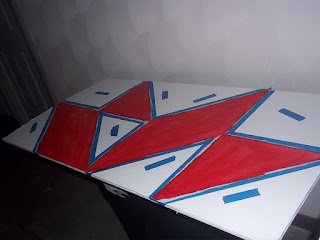
My mom has wanted a barn quilt for quite some time. When a co-worker began talking about a barn quilt that she had ordered for her mother, I decided that it would be the perfect gift for my mom for Christmas. In researching the barn quilts, I realized that if I ordered one, I would not likely have it in time for our family get together. When I realized this, I began researching how to make one. I came across this blog that detailed the supplies needed and process involved in making a barn quilt. I created a list of supplies needed and went to my local Home Depot to pick them up. I had them cut a large sheet of plywood into 4 equal sized 4x2 foot sections. I planned to make the barn quilt 4 ft x 4 ft, but thought that the smaller sections would be easier to transport and could easily be joined together when the time came to hang it.
Once I got the supplies home, I covered the front of the plywood with several coats of white exterior satin latex paint.

Once it was sufficiently covered and dry, I measured out and drew boxes around one foot sections. I followed the pattern that I chose to then divide the boxes into triangles. Finally, I taped off the sections that would be painted another color. I placed the tape so that I would paint over any pencil lines and then painted a light coat of white along the edges to lock the edges and prevent any bleeding.


I also added a strip of tape to the sections that would not be painted as a reminder to myself! I didn't want to get caught up in the painting and accidentally paint the wrong part. After the paint dried, I added several coats of my red exterior paint.


I removed the tape almost immediately after I finished the third coat. Once it was completely dry, I moved the two halves together to see the finished product.

I loved it! Though the front was finished, I realized that in my haste to see the final product, I had neglected to paint the back sides of the plywood. With the barn quilt hanging outside, it would be necessary to coat the back side of the quilt to protect it from the elements as well. I flipped the pieces over and painted the back sides as well. Now that both sides are painted, I still need to add a clear coat to both sides to give it extra protection from peeling and cracking.
We finally had our family Christmas this weekend and I was so happy with my mom's response!


She absolutely loved it! I told her that I had not sealed it yet as I was not sure if she wanted to change anything or add more color to it. She immediately responded that it was perfect. She said that she has seen smaller 1ft x 1ft squares where family members choose a design that they like and each paint one to represent themselves. I told her that I had plenty of supplies left, so I guess I know what we will be doing this summer! I am so excited to try out some more difficult patterns and to see what each family member picks out for their favorite design.

Coffe filter and yarn wreaths

Several months ago, I decided to jump on the band wagon and make my own coffee filter wreath. I purchased a straw wreath from Michaels and a couple of packages of coffee filters from the Dollar Store. One night when Randy was out of town and after the kids had gone to bed, I plugged in my glue gun and got to work. I started by folding an entire package of filters. This part was tedious, but it worked easier to have everything ready so that once I got to gluing, I had lots of filters prepared. Once I had the filters all folded, I started by gluing the filters to the outside edge of the wreath. I glued them overlapping each other by the tips to make it extra full.

A close up:

When the edge was finished, I started gluing filters onto the main part of the wreath. If you look closely, you will see that the filters are attached different on the front and sides. I glued the first row on the front so that the tip of the filter was even with top of the filter on the outside. After going around the entire front of the wreath, I did another row, staggered so that the tip was glued on between the tips of two other filters. I repeated this until I had about 4-5 rows and it completely covered the front.

Once the middle was finished, I glued filters onto the inside of the wreath in the same method that I used on the outside.
I love how fluffy it is. Although it is perfect for the winter months because it reminds me of a giant snowball, I think that it could be pretty all year round.


My second wreath was a yarn wreath for Valentine's Day. Several months ago, I purchased a heart shaped straw wreath from Goodwill for $1.25. I had plans to cover it in felt rolled flowers, but love the look of the yarn wrapped wreaths. I decided that the heart shaped wreath would look to busy with the rosettes and so decided to wrap it in yarn. I purchased some red yarn this past weekend for $2.00 and sat down to watch my DVR during the kids nap. I taped the end of the yarn in place on the back of the form. Then I wrapped the yarn very closely together one time around the entire wreath form. There were a few spots where the straw stuck out and let the wreath form show through, so I went around the whole wreath a second time, really concentrating on filling in the few blank spots. I cut the yarn when I was finished and hot glued it to the back. Finally, I tied a piece of yarn on the top for hanging.


I love the new wreath! My seasonal wreath looked pretty boring last year with just the red heart garland. The yarn wreath helps to fill it in a little. Though the heart shaped yarn wreath adds a little extra, I still think that something is missing. I am thinking about adding some accents in pink, maybe cut out hearts or cupids. Adding some letters to spell a Valentines sentiment might be nice as well.

What wreaths have you made lately?

Wednesday, January 4, 2012

Sentimental Artwork

In November, we celebrated my husband's 31st birthday. I made his favorite, stromboli, for dinner and baked a cake. And that was it! No gifts, no cards, nothing! I am terrible at giving gifts to my husband for several reasons: 1) He buys everything he wants. If he wants something, he buys it. He doesn't drop hints, he just buys it. 2) He wants electronics, tools or boating gear and I have no idea what to buy him. I have no clue with electronics and would not venture to guess what he wants. 3) He is a bargain hunter and would no doubt find a better deal than I did and be disappointed that I spent more money than I should have. I discussed these and more reasons with him after his birthday as an apology for not doing a better job at finding a gift for him. His response to me was that his favorite gift that I ever gave him, was when we were first dating and I quilted a nascar blanket and accessories for him. I was totally taken aback!
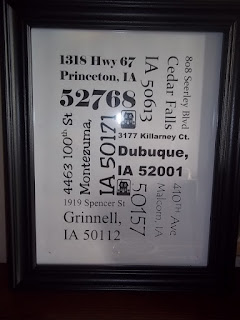
After this stunning revelation, I began to think about things that I could do or make for Christmas. I have seen several things on Pinterest and blogs that I was dying to try out and that I thought would be the perfect personalized gift to sum up our 10 years together so far. First, I worked on a subway art piece using the addresses we have lived at together since we started dating. I used Word to create the document and simply changed the text direction, fonts and letter sizes to create a puzzle using our addresses.

When he first opened the frame, my husband was a bit upset thinking that I was rubbing it in his face how many times we have moved. I immediately explained to him that each of the addresses holds special memories for me and helped to shaped where we are now. Though I do not look forward to ever having to move again, I do not regret the moves that we have made in our lifetime.
The second gift that I created was a collection of maps from meaningful places throughout our relationship. I simply saved the maps from google as pictures and then cropped and edited them in picnik.
I included a map of where we met, The University of Northern Iowa, and where our relationship bloomed.

Next was a map from the location where we were married and had our reception.

And finally, I included a map of our current home.

I removed a candle sconce from our bedroom and hung these framed maps in it's place while he was gone to work. He noticed it immediately when he came home and remarked how cool it was. I am thinking that I could add another set of maps with the house that we brought our children home from the hospital to, our first house together, and our favorite vacation spot to name a few. The possibilities are endless!


I am sharing this with Allison and her Hookin' up with HOH party.